في هذا المقال سنتعلم كيفية صنع الـ NFT على شبكة سولانا المحلية ومن ثم نقلها إلى شبكة سولانا العامة.
المتطلبات الأساسية:
- تثبيت NodeJS
- معرفة بـTerminal/CLI
- محرر نصوص
- تثبيت TypeScript
كيفية صنع الـ NFT على بلوكتشين سولانا
أولاً: إعداد المشروع على شبكة سولانا المحلية
قم بفتح الـ Terminal ومن ثم انتقل إلى المجلد الذي ترغب بإنشاء مشروعك فيه. بعد ذلك، قم بتشغيل الأوامر التالية باتباع الترتيب التالي:
mkdir SolanaNFT
npm install --prefix ./SolanaNFT @solana/web3.js @solana/spl-token
cd SolanaNFT
touch index.ts
يقوم الأمر الأول بإنشاء دليل مشروع جديد تحت اسم SolanaNFT.
أما الأوامر التالية ستقوم بثبيت API الجافا سكريبت الخاصة بسولانا
npm install –prefix ./SolanaNFT @solana/web3.js @solana/spl-token
أما @solana/web3.js وType Script Library يتم استخدامهم للتفاعل مع برنامج SPL Token.
في النهاية مع touch index.ts، نقوم بإنشاء ملف Typescript Index.ts حيث سنكتب كل التعليمات البرمجية الخاصة بنا.
ثانياً: الربط ببلوكتشين سولانا العامة
افتح دليل مشروع SolanaNFT داخل المحرر الذي تختاره، لنبدأ بكتابة التعليمات البرمجية للربط ببيلوكتشين سولانا
داخل ملف index.ts، سنرغب في البدء باستيراد جميع الوظائف التي سنحتاجها من @ solana/web3.js و@solana/ spl-token. أضف عبارات الاستيراد التالية:
import { clusterApiUrl, Connection, Keypair, LAMPORTS_PER_SOL } from  "@solana/web3.js";
import { createMint, getOrCreateAssociatedTokenAccount, mintTo, setAuthority, transfer } from  "@solana/spl-token";
ملاحظة: إذا كنت ترى أخطاء من سطور التعليمات البرمجية هذه ، فمن المحتمل أنك لم تقم بتثبيت المكتبات. تأكد من أنك في الدليل الصحيح وقم بتثبيتها مرة أخرى.
أضف هذه الوظيفة أسفل عبارات الاستيراد:
(async () => {
// Connect to cluster
const connection = new Connection(clusterApiUrl('devnet'), "confirmed");

})
في هذه المرحلة نحن نقوم بدعم اتصال جديد. مما يتطلب نقطتين؛ الأولى هي نقطة نهاية “URL” وتشير إلى شبكة سولانا. وفي حالتنا سنستخدم clusterApiUrl(‘devnet’) للإشارة إلى نقطة النهاية العامة الخاصة بسولانا وهو ما سنستخدمه في هذا الدليل.
تمتلك بلوكتشين سولانا ثلاث شبكات
- الشبكة الأساسية
- الشبكة التجريبية
- شبكة devnet.
الآن بعد الانتهاء من إنشاء الاتصال يمكننا الآن البدء بإنشاء الـ NFT.
ثالثاً: إنشاء محفظة جديدة
المهمة الأولى التي سنحتاج إلى إنجازها هي إنشاء حساب بمحفظة وتمويلها. سنحتاج أيضاً إلى التأكد من اكتمال كل خطوة بنجاح قبل الانتقال إلى الخطوة التالية. هذا هو الشكل الذي سيبدو عليه هذا الرمز:
// Generate a new wallet keypair and airdrop SOL
const fromWallet = Keypair.generate();

const fromAirdropSignature = await connection.requestAirdrop(
  fromWallet.publicKey,
  LAMPORTS_PER_SOL
);

// Wait for airdrop confirmation
await connection.confirmTransaction(fromAirdropSignature);
تذكر أن تضيف هذا الرمز داخل وظيفة async.
السطر 2: نحن نستخدم فئة Keypair التي قمنا باستيرادها سابقاً لإنشاء زوج مفاتيح جديد عن طريق generate(). يؤدي هذا إلى إنشاء زوج جديد من المفاتيح العامة والسرية وتخزينها في من المحفظة.
السطر 4: نطلب ايردروب في محفظتنا. باستخدام طريقة requestAirdrop () التي تتطلب المفتاح العام ومبلغ SOL الذي ترغب في تلقيه. Lamports هي ما يعادل Solana لـ wei. معظم الطرق التي تتطلب رقماً ستعتمد بشكل افتراضي على قياس lamport. في حالتنا، LAMPORTS \ _PER \ _SOL هو ثابت يمثل 1 SOL قيمة lamports.
السطر 9: للتأكد من نجاح الايردروب، فإننا نستخدم طريقة confirmTransaction وننتظر نجاحها. تسمح لنا هذه الطريقة بتمرير معاملة موقعة كوسيط وجعل البرنامج ينتظر حتى يتم تأكيده قبل الانتقال إلى أجزاء أخرى من الكود. هذا مهم لأن خطوتنا التالية يجب أن يتم دفع الرسم فيها.
رابعاً: إنشاء عملة رمزية جديدة
سنحتاج الآن إلى إنشاء عملة رمزية جديدة واسترداد حساب الرمز الخاص بنا.
const mint = await createMint(
  connection,
  fromWallet,            // Payer of the transaction
  fromWallet.publicKey,  // Account that will control the minting
  null,                  // Account that will control the freezing of the token
  0                      // Location of the decimal place
);
ستكون وظيفة createMint هي التي تُنشئ رمزنا المميز الفعلي. يستغرق 6 متطلبات:
1. الاتصال بشبكة سولانا. (connection)
2. الحساب الذي سيدفع الرسوم. (fromWallet)
3. المفتاح العام للحساب الذي يمتلك صلاحية إصدار الرموز المميزة من هذا النوع. (fromWallet.publicKey)
4. المفتاح العام للحساب الذي لديه سلطة تجميد الرموز المميزة من هذا النوع. هذه الحجة اختيارية. (null)
5. موقع المكان العشري للرمز.
لمزيد من المعلومات حول هذه الوظيفة ووظائف Spl-token الأخرى المستخدمة في هذا الدليل، يمكنكم زيارة هذه الصفحة في Solana-labs.github.io.
بمجرد إنشاء العملة الرمزية، نحتاج إلى الحصول على حساب الرمز المميز من عنوان سولانا fromWallet. إذا لم يكن موجوداً، فيجب علينا إنشاؤه. لهذا ، سنستخدم دالة getorCreateAssociatedTokenAccount ()، لتمرير معظم القيم السابقة، وتخزينها في fromTokenAccount:
// Get the token account of the "fromWallet" Solana address. If it does not exist, create it.
const fromTokenAccount = await getOrCreateAssociatedTokenAccount(
  connection,
  fromWallet,
  mint,
  fromWallet.publicKey
);
يمكنك التفكير في سلسلة الوصاية على النحو التالي: NFT موجود في الحساب ، ومحفظتك تمتلك هذا الحساب.
> المفاتيح -> المحفظة -> الحساب -> NFT (من أعلى إلى أسفل).
خامساً: إنشاء حساب هلى محفظة لإرسال الـ NFT إليها
قمنا بإنشاء حساب لإرسال الـ NFT الآن نحتاج إلى إرسال حساب لتلقي الـ NFT. سيبدو الكود البرمجي لهذه الخطوة مألوفاً لكم لأننا سنعتمد على نفس الخصائص والمتغيرات لإنشاء محفظة جديدة.
// Generate a new wallet to receive the newly minted token
const toWallet = Keypair.generate();

// Get the token account of the "toWallet" Solana address. If it does not exist, create it.
const toTokenAccount = await mint.getOrCreateAssociatedAccountInfo(
  connection,
  fromWallet,
  mint,
  toWallet.publicKey
);
تنشئ مجموعة الكود أعلاه محفظة بمجموعة منفصلة من المفاتيح العامة/السرية ثم تنشئ حساباً يربط mint variable بالمحفظة التي تم إنشاؤها حديثاً.
سادساً: سك الـ NFT وإرسالها
حان الوقت الآن لصك الـ NFT وإرساله! خذ لحظة لإلقاء نظرة على الكود أدناه الذي يحقق ذلك.
// Minting 1 new token to the "fromTokenAccount" account we just returned/created.
let signature = await mintTo(
  connection,
  fromWallet,               // Payer of the transaction fees
  mint,                     // Mint for the account
  fromTokenAccount.address, // Address of the account to mint to
  fromWallet.publicKey,     // Minting authority
  1                         // Amount to mint
);

await setAuthority(
  connection,
  fromWallet,            // Payer of the transaction fees
  mint,                  // Account
  fromWallet.publicKey,  // Current authority
  0,                     // Authority type: "0" represents Mint Tokens
  null                   // Setting the new Authority to null
);

signature = await transfer(
  connection,
  fromWallet,               // Payer of the transaction fees
  fromTokenAccount.address, // Source account
  toTokenAccount.address,   // Destination account
  fromWallet.publicKey,     // Owner of the source account
  1                         // Number of tokens to transfer
);


 console.log("SIGNATURE", signature);
})();
لتنفيذ البرنامج، قم بتشغيل الأوامر التالية واحدة تلو الأخرى:
tsc index.ts
node index.js
سيقوم هذان الأمران بتشغيل ملف TypeScript، وإنشاء ملف JavaScript بنفس الاسم، وتشغيل هذا الملف. يجب أن ترى توقيعاً تم تسجيله في الجهاز بعد مرور بعض الوقت.
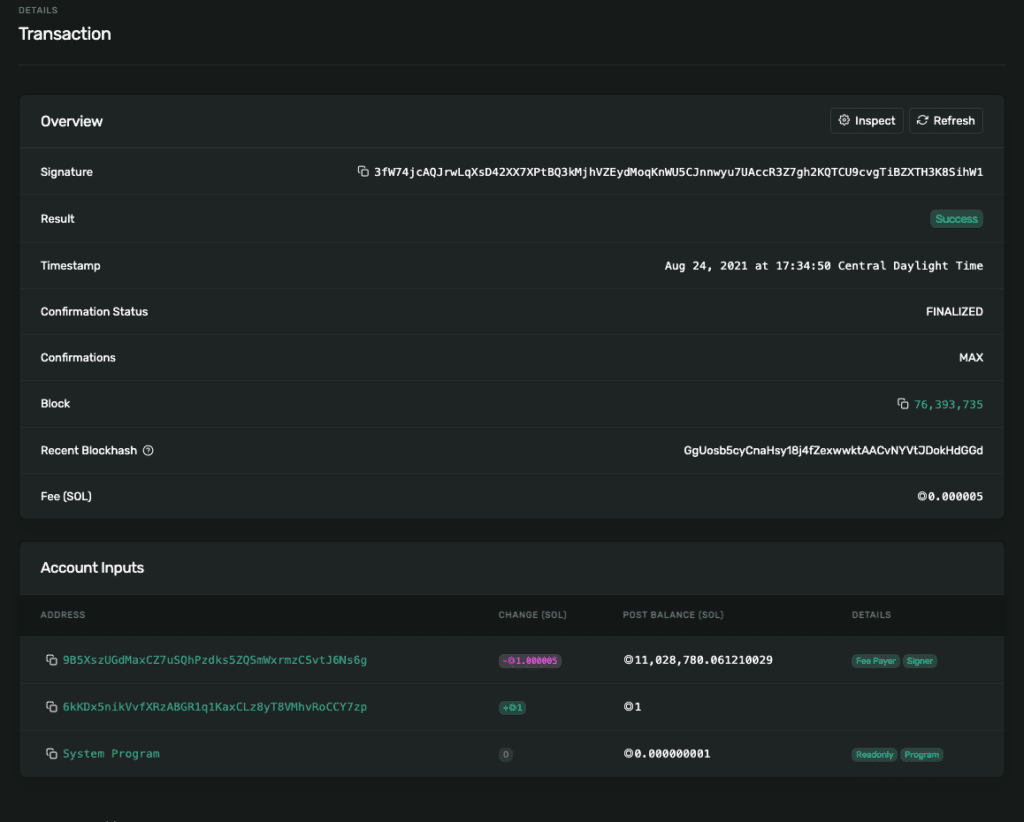
إذا قمت بزيارة Solana Explorer، يجب أن ترى توقيعك، مشابه للشكل أدناه:

إليك الكود كاملاً، لتستطيع بمقارنته بالكود الخاص بك:
import { clusterApiUrl, Connection, Keypair, LAMPORTS_PER_SOL } from  "@solana/web3.js";
import { createMint, getOrCreateAssociatedTokenAccount, mintTo, setAuthority, transfer } from  "@solana/spl-token";

(async () => {
  // Connect to cluster
  const connection = new Connection(clusterApiUrl("devnet"), "confirmed");

  // Generate a new wallet keypair and airdrop SOL
  const fromWallet = Keypair.generate();
  const fromAirdropSignature = await connection.requestAirdrop(
    fromWallet.publicKey,
    LAMPORTS_PER_SOL
  );

  // Wait for airdrop confirmation
  await connection.confirmTransaction(fromAirdropSignature);

  // Create a new token
  const mint = await createMint(
    connection,
    fromWallet,            // Payer of the transaction
    fromWallet.publicKey,  // Account that will control the minting
    null,                  // Account that will control the freezing of the token
    0                      // Location of the decimal place
  );

  // Get the token account of the fromWallet Solana address. If it does not exist, create it.
  const fromTokenAccount = await getOrCreateAssociatedTokenAccount(
    connection,
    fromWallet,
    mint,
    fromWallet.publicKey
  );

  // Generate a new wallet to receive the newly minted token
  const toWallet = Keypair.generate();

  // Get the token account of the toWallet Solana address. If it does not exist, create it.
  const toTokenAccount = await getOrCreateAssociatedTokenAccount(
    connection,
    fromWallet,
    mint,
    toWallet.publicKey
  );

  // Minting 1 new token to the "fromTokenAccount" account we just returned/created.
  let signature = await mintTo(
    connection,
    fromWallet,               // Payer of the transaction fees
    mint,                     // Mint for the account
    fromTokenAccount.address, // Address of the account to mint to
    fromWallet.publicKey,     // Minting authority
    1                         // Amount to mint
  );

  await setAuthority(
    connection,
    fromWallet,            // Payer of the transaction fees
    mint,                  // Account
    fromWallet.publicKey,  // Current authority
    0,                     // Authority type: "0" represents Mint Tokens
    null                   // Setting the new Authority to null
  );

  signature = await transfer(
    connection,
    fromWallet,               // Payer of the transaction fees
    fromTokenAccount.address, // Source account
    toTokenAccount.address,   // Destination account
    fromWallet.publicKey,     // Owner of the source account
    1                         // Number of tokens to transfer
  );

  console.log("SIGNATURE", signature);

})();


